All rights reserved, Joe Garlitz 1997, g-a-r-l-i-t-z-j(at)eoniDOTcom
HOME
===
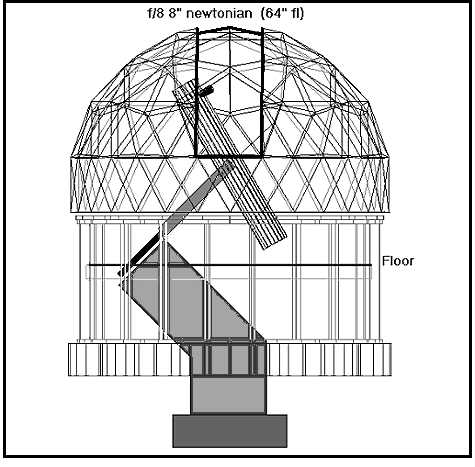
FIGURE 1 "wire_g.jpg"
INTRODUCTION
The "geodesic dome" design has been patented by the late Buckminster Fuller. No use of this design for monetary gain is of course allowed. I make no claims on the geodesic design. However, the geometry of this dome and all cutting patterns presented here were calculated by myself from basic geometric principles using DesignCad-3D (TM) and TurboCad-2D (TM).DESIGN
The dome is straight forward to construct but it takes a lot of attention to detail. The design is based on a geodesic composed of pentagons and hexagons. At the top of the dome is a pentagon. 5 hexagons surround this pentagon. 5 pentagons are then arranged around the perimeter in the niches formed by the hexagons. A second row of 5 hexagons is placed between the pentagons. Finally 5 half-hexagons are placed beneath each of the pentagons. Studying the figures should make this clear.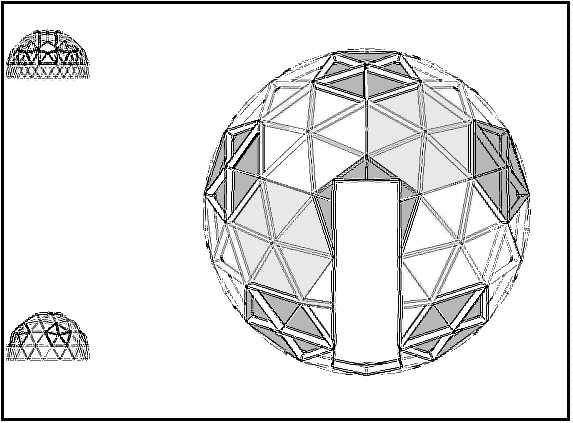
FIGURE 2 "domfrm_g.jpg"
The entire dome is made of just two shapes; the triangle that forms the pentagons;
FIGURE 3 "pent_tri.gif" ===
and the triangle that forms the hexagons. ===
FIGURE 3 "hex_tri.gif" ===
Note that the sides of the pentagons and hexagons are equal. In the
dome shown here, the polygon side dimension is 2 feet. This provides a
dome diameter of 9 feet 4 inches. This fits well with the size of my 64
inch focal length newtonian and worked out well with the size of the construction
materials, i.e.. 4'x 8' sheets.
This design can be scaled to any size dome. All angles are as shown
here. All linear dimensions are scaled by what ever factor you choose.
CONSTRUCTION
Cutting
The triangles are cut from 3" thick bead-board. The foam board cuts easily with a hot wire. You can rig-up a "saw" using the wire from an old electric heater element or using iron wire like bailing wire or re-bar tie wire. The wire is heated using an electric current. A rheostat connected to the wire, powered by a car battery is probably the safest approach. An adjustable transformer can also be used with relative safety for voltages below 20 volts.**CAUTION**
BUT NOT DIRECTLY!
**CAUTION**
IF YOU DO NOT UNDERSTAND COMPLETELY HOW TO DO THIS SAFELY, DON'T!
**CAUTION**
Set up a cutting table large enough hold a 4x8 sheet and to make a full 4' cut. See figure 8 for a diagram of a cutting table. This setup allows a long straight and perpendicular cut.
FIGURE 8 "cut_tabl.gif" ===
The dome requires 30 pentagon triangles and 75 hexagon triangles. These are cut from seven 4'x 8' sheets of foam. Figures 9, 10 and 11 show the layout for cutting the sheets. This layout provides 29 pentagon triangles and 72 hexagon triangles. The remaining 3 hexagon triangles and the pentagon triangle can be made be cementing scraps together. The scrap triangles should be placed in the area that the will be cut out for the slit.
FIGURE 9 "p_h-cut.gif" ===
===
FIGURE 10 "p_h-cut2.gif" ===
===
FIGURE 11 "hex_cut.gif" ===
In laying out the triangle cutting pattern, allowance must be made for the width of the cutting wire. Two dimensions are shown for the height of the triangles in the cutting patterns. The smaller dimension is the actual triangle dimension. The larger dimension is to allow for the cutting width. Figure 12 shows a close up of how to offset the triangles to allow for the cutting kerf.
FIGURE 12 "kerf.gif" ===
Triangle shaping
The triangles are three dimensional, thus the edges must be tapered to fit into the dome. The triangles are equilateral. The equal sides form the "spokes" of the polygons; the base of the triangles form the polygon sides. Templates for tapering the triangles are shown in the following figures. It is important not to confuse the sides and bases.
===
FIGURE 4 "p_b-tmpl.gif" ===
Pentagon-triangle base taper template.
===
FIGURE 5 "p_s-tmpl.gif" ===
Pentagon-triangle side taper template; taper both sides.
===
FIGURE 6 "h_b-tmpl.gif" ===
Hexagon-triangle base taper template.
===
FIGURE 7 "h_s-tmpl.gif" ===
Hexagon-triangle side taper template; taper both sides.
Setup the cutting table for cutting the tapers. Figure 9 shows a setup to cut the taper on the triangle sides.
FIGURE 13 "cut_tapr.gif" ===
Note, that there is a narrow edge left uncut by this setup. This is necessary to allow a uniform cut along the entire side of the triangle. The guide edge must be long enough to guide the triangle through the entire cut.
Cutting the taper is the most likely area to mess up.
- 1) Separate the hexagon triangles from the pentagon triangles.
- 2) Boldly mark one face of each triangle as the inside.
- 3) Mark the base of each triangle.
- 4) Set the cutter using the CORRECT template and cut the base tapers first.
- 5) Reset the cutter using the correct template and cut the side tapers;
Note; Cut the triangles with the INSIDE face UP.
again with the INSIDE face UP.
The taper of the hexagon bases and the pentagon sides are the same. So cut the pentagon bases first, then the hexagon bases. Then cut the pentagon sides, with this same angle. Finally cut the hexagon sides.
Use a course grit sandpaper on the cut-faces to remove any flashing left by the taper cutting.
Assembly
With the triangles finished, it is time to assemble the pentagons and
hexagons.
I used 3M "77" spray contact cement to glue the triangles together.
This cement bonds stronger than the foam board, so you must be careful
to have the pieces properly placed before contact.
You can make a trial fit by taping the triangles together with duct tape. It is easy enough to cement the triangles together. However the last triangle of each polygon is more difficult. It is nearly impossible to get this last one in place without prematurely touching the contact cement. You can keep the cemented surfaces separated by putting a piece of paper between the cemented surfaces after the contact cement has dried. When the triangle is then put in position, the paper is slipped out.
REMEMBER to make 5 half hexagons. It might be best to make these first as a good place to get some practice. Mark the half-hexagons and set them aside.
Making all the hexagons by joining 2 half-hexagons together is a good way to avoid the problem of having to inserting the last triangle. (This doesn't work for the pentagons, however.)
With 6 pentagons, 10 hexagons and 5 half-hexagons completed, the dome
can be assembled.
An extra set of hands is VERY helpful here.
Mark the hexagons and pentagons made from the scrap triangles, use these where the dome slit will be cut out.
Since the top of the dome will be cut out, start with a pentagon having scrap triangles. Cement 5 hexagons around this pentagon. (Note, one of these hexagons will be cut for the slit so it too should be one with scrap triangles).
Next, cement 5 pentagons in the notches formed by the hexagons, and then 5 hexagons in the notches formed by the pentagons. Finally place the remaining hexagons around the dome, and cement the 5 half-hexagons in place to complete the dome. Study figure 2 to see how the hexagons and pentagons go together.
At some time it might be easier to do this by turning the whole thing
upside-down.
This is probably a good place to mention that THE COMPLETED DOME WILL
NOT GO THROUGH A SINGLE CAR GARAGE DOOR.
Be sure you work where you can get the dome outside. I assembled my
dome in two pieces; the upper half to the row of 5 pentagons; and the lower
half of the remaining 5 hexagons and half-hexagons. It is best to assemble
the whole dome in one piece, (but only if you can get it out of the garage).
With the dome completed you will notice that it does not sit flat on
the floor. You must trim the bottom to make it flat. This can be done with
the hot wire, if you are up to making this set up, or you can use a fine
toothed saw and trim the bottom.
Reinforcing the Dome
The dome sits on a ring made of particle board. This ring will be the surface for the rollers to run on, allowing the dome to turn. The ring is cut from a 4'x 8' sheet of 3/8" or 1/2" particle board. Figure 14 shows the cutting pattern for the base ring.
FIGURE 14 "base_cut.gif" ===
Cut the ring segments as shown. Then draw a circle just over 57-1/4" in radius on a flat surface. Lay out the segments on the work surface just inside the drawn circle. It will take 7 and about 1/4 segments to complete a layer. With the segments together, uniformly inside the circle mark the 8th piece and cut it to fit. Lay the second layer over the first, lapping the joints in the first layer. Again mark the last segment and cut it to fit. Set the top layer off and spread carpenters glue on the lower ring, replace the upper ring and weight it down while the glue sets. Check the ring to make sure it is round and within the circle. When the glue is, set the ring can be trimmed and trued to a circle by using a router. The router is fastened to swing from the center of the base ring by a strap or wire. Routering with this setup allows the inside of the base ring to be a true circle. This is important so the horizontal guide rollers that run on the guide band will not bind. More on this later
When the base ring is ready, place the dome on the ring. Center the dome on the ring and glue the dome to the base ring using carpenter's glue. (Note: if you haven't trimmed the bottom of dome, do it now so the dome will sit flat on the ring.)
To facilitate centering the dome, you might cut an access hole in the area where you will cut out the dome slit. The hole should be only large enough to allow you to get inside the dome.
The base ring must be reinforced to the dome. This is done by gluing plywood plates with gussets to the bottom row of triangles and fastening the gussets to the base ring. Refer to figure 15 for details.

Figure 15, Reinforcement for dome & ring
===
The gussets that fasten to the plywood triangles and the dome ring are cut from 2"x 4"s. The width and angle of the gussets must be measured and cut to fit. There are several different angles that must be cut. It is best to glue and nail the plates to the gussets. The plates can then be glued to the dome and the gussets screwed to the base ring.
There is a band of masonite fastened inside the base ring, also shown
in figure 15. This band will provide a centering guide for the dome as
it rotates. Several horizontal rollers placed around the dome will run
on the outside of this guide band to keep the dome centered. It also provides
additional support to the base ring and gussets. The guide band is made
of 6" wide by 8' long strips cut from a 4'x 8' sheet of 1/8" or 3/16" masonite.
Two layers are laminated to form the band. It will take just over 3 and
a 1/3 strips for each layer of the band. Place 3 strips inside the base
ring, then measure and cut the final piece. Cutting it just a fraction
too long, will allow the band to "snap to" and hold itself in place. Cut
the second layer of the band in the same way. Glue the two layers together
over lapping the joint of the first layer. Clothes pins can be used to
clamp the two band layers together. Proper clamps, though, will be needed
at the butt joints to keep the joints tight and smooth.
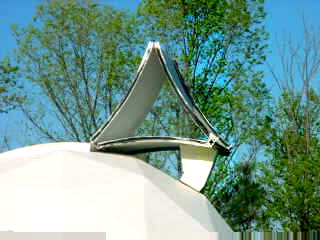
The Dome Slit
The dome slit is easily cut into dome working from the inside. Use a fine toothed hand saw. I cut the slit 24" wide using the side of the top pentagon as a reference, and cutting down through the top and bottom of the adjoining hexagon sides. This is adequate for telescopes 8" or less. A 30" slit is recommended for larger scopes. The slit is cut past the very top of the dome so the telescope can have a clear view of the zenith. (Note, the frame as designed, is wide enough to accommodate the smaller radius at the wider slit edges.)It is important that the sides of the slit are cut parallel to each other and are parallel to the plane passing through the center of the slit. Resist the temptation to cut perpendicular to the surface of the dome where you are cutting. To keep the cut straight, fasten a template of stiff paper or card board, the width and length of the slit, over the area to be cut. Cut along the edge of the template and perpendicular to its surface.
A rigid frame is constructed to reinforce the slit. The sides of the frame are made by laminating arcs cut from masonite. The arc of the frame is just a little over 90°. Figure 16 shows the cut pattern for the slit frame sides:
Figure 16, Cut pattern for slit frame sides
Lay out two arcs end to end, place a third arc on top of these, centered on the joint. Cut a fourth arc in half, and place the halves at each end of the third arc. Finally, place two more arcs on the stack to complete the side. The pieces are glued together. When the glue is set, make ends for the top and bottom of the slit frame, forming a "box" of the sides, top and bottom. You will want to smooth and finish sand the sides before you assemble the frame "box". This allows the two sides to be shaped together.
The frame is placed into the slit cut-out in the dome. It is glued in place using carpenters wood glue. Adjust the frame, in and out so you have the inside edge of the cut just covered. This leaves a substantial lip on the outside to protect from rain and snow.
It is a good idea to place a reinforcing triangle plate and gusset under
the bottom end of the slit box. The 2x4 gusset should extend between the
base ring and the bottom of the slit frame. If you will use the slit as
an entrance, the bottom of the frame should be wide enough to extend into
the dome and rest fully on the 2x4 gusset under it. (Note, the slit bottom
should not be a step, but in any case reinforce it because it will get
stepped on.)
The Dome Support Structure
The dome structure is basically completed at this point. The outside surface needs to be finished to protect it from the elements. Before finishing the dome surface, the support structure should be constructed and prepared to accept the dome. The dome as constructed to this point will weigh less than 100 lbs. However, with the stucco finish, it will weigh 300 to 400 lbs. Obviously, it will be much easier to put the dome on its support before the outside surface is coated.The under-structure must be designed to accommodate the specific type and size of scope the dome is housing. My newtonian is mounted on a fork close to the floor. The side wall is thus only 18" high to the bottom of the dome, with the bottom of the slit 30" above the floor. As a result, I use the slit for access.
Figure 17, Access steps
A cassegrain will, of course, require a much higher side wall. The access will most likely be through a door in the under-structure. The dome can be supported on a circular structure like I built, or a structure of what ever shape and size suits the needs of the instruments and the observer. This is left as an exercise for the builder ;-)
The dome is supported on rollers mounted on the under-structure. I used synthetic "rubber" cart wheels available at departments stores and building supply stores. Wide, small diameter rollers are preferable, but any sturdy wheel with a decent bearing surface will do. Place at least 5 rollers around the perimeter of the under-structure to support the dome.
Guide rollers are place between the support rollers. These too are cart wheels. Thin, large diameter wheels are best for this purpose.
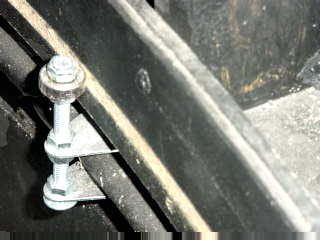
Figure 18, Support & Guide Rollers
Dome Surface Finish
To make the Styrofoam surface durable, it must be coated with a weather resistant surface. Also, to keep the elements out of the structure, a slit door and a perimeter seal must be fashioned. The door can be constructed after the surface is finished, so we will deal with that later. The perimeter seal must be integrated into the finished surface. Figure 19 shows the detail for the seal.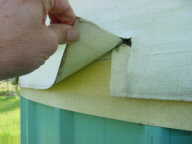
Figure 19, Perimeter Seal Detail
The seal material can be made from fabric such as canvas, and painted with the dome. However a better material, that will also be used to seal the door panels, is rubber sheeting used to cover RV roofs. You can probably buy a small piece from a trailer repair shop.
The seal is made of a number of strips, each about 12" long and 4" wide. After the dome has been set in place on its rollers, the strips are fastened to the outside edge of the dome ring, overlapping the strips 2"- 3" . Fabric can be glued with carpenter's wood glue. Rubber can be cemented with the contact cement used to build the dome. Tacking the strips down to the ring with brads helps hold the strips in place and gives them added strength. The bottom edge of the dome triangles can be trimmed smooth to the seal with very course sand paper. This gives a finished look to the base and makes it easier to bring the stucco finish to the seal.
With the seal strips in place the dome surface is ready to finish. The surface of the foam is coated with a thin layer of concrete (stucco). Window screen is imbedded for reinforcement. I used fiberglass screen, however, if one is going to use a CCD camera in an area with a significant amount of RFI, aluminum screen would provide a shield. NOTE: [If your observatory is at an exposed site, and you use aluminum screen, it would probably be wise to provide several grounding conductors from the dome reinforcing screening to a ground rod, allowing grounding of a possible lightening strike.]
The concrete is best if mixed from scratch. A very "rich" mix is made using the following:
by volume;
- 2 parts screened sand;
- 1 part portland cement;
- 1/4 part mason's lime.
The sand must be screened. Use window screen to sift out any large granules. It's best to start with "masons" sand. This is sand that has been screened at the sand and gravel plant, but it will still contain a lot of "boulders". You can use river sand, but it must be washed and drained first. To wash the sand place it in a bucket with a garden hose turned on full. Stir the sand with the water running to lift and wash sediment and organics out over the top of the bucket. The sand must be drained or it will be too wet to give a proper mix.
Mix together the sand and the lime. Add just enough water to make a damp mix. After the sand and lime are well mixed, add the cement (no water), and mix thoroughly. The mix will soften as you mix it, so resist the temptation to add water. To test the mix before adding water, vigorously mix a small area. If it softens, continue to mix the batch until it all softens. Add water only after mixing very well and add in small amounts. The mortar is to be like soft butter or cake frosting, not thin or runny.
The lime makes the mix "buttery". It has a better effect if mixed with the sand before adding the cement. There is a wide range you can use to make the mortar and still get a good product. The cement can be as rich as 1:1 with the sand, and as lean as 1:3 and still give a good sound concrete. If the mortar is not "squishy" soft, add a little more lime. The best mortar is the mortar that works best, so experiment.
Pre-mixed concrete can be used; use "mortar mix". This mix needs to be screened too. You will probably find that it needs a bit of masons lime added, to make the mortar soft enough to apply easily.
CAUTION: Both the lime and the cement are harsh basic (Caustic) materials. I have found that rubber kitchen gloves work well to protect my hands. The heavy rubber construction gloves are too stiff to allow close work. Kitchen gloves don't last as long but are much easier to work with and quite inexpensive.
There is one other ingredient that you might want to use in your mortar, a substance that looks and smells like carpenters wood glue, (Elmer's glue). It is called concrete bonder. you can use it in your mortar and on the dome. If your mortar is not sticking tightly to the dome when it is set, try using this material. Add some to the mix as the directions on the container indicate. Also mix some of the bonder with water and paint it on the dome. Paint it ahead of your working area, so it will be damp but NOT wet.
Before beginning to lay up the mortar, place several braces in the dome
slit to keep it from sagging under to weight of the mortar. When the mortar
is set it will be very strong and support the dome, but as you lay it on
the foam, the dome slit will sag if not braced; (voice of experience).
Cut several pieces of window screen basically large enough to cover a triangle. Try "dry fitting" them to the dome. The screen should lap the seams between the triangles. See how the screen will adjust to the surface. Aluminum screen will stretch more easily than the fiberglass screen, since the strands are not bonded to each other. When you have a good feel for placing the screen without wrinkles or bubbles you are ready to start laying on the mortar.
Starting at the bottom, work around the dome doing the bottom layer of triangles. Remember to keep the seams of the screen on the face of the triangles so the triangle seams are overlapped by the screen. Fit the screen around the bottom edge and onto the perimeter seal. You can cut slits into the screen to get a good fit. Run the mortar onto the seal where it fastens to the base ring. Use plenty of mortar, shaping it around the bottom of the triangles and onto the seal.
When laying on the first layer, fill in the voids at the triangle seams and any hole dents etc. Work the mortar on to the dome slit frame. Run the screen up to the slit frame and bend it up along the frame a 1/2 inch or so. Cover the screen at the seam well with mortar, working it into the joint and onto the frame.
Work completely around the dome, one layer at a time, letting the mortar cure between layers. This will allow the weight of the mortar to be uniformly loaded on to the dome, and also allow the first layers to strengthen the dome as you put more and more weight on it.
Once the mortar is laid on, the next trick to getting a sound surface is to cure the concrete slowly. This is done by keeping the new mortar wet. As soon as the mortar skins over you can wet it down with a fine mist. Avoid streams that might run down the surface, as they can cut into the fresh mortar. After 5-6 hours the mortar will be fairly firm and can be watered more heavily. Do not let the mortar dry out for at least 3-4 days. The longer it is wet, the stronger it will be. You can use plastic sheeting to wrap the dome to hold the moisture. Filmy painters drop cloth is cheap and works well.
Practice working with the mortar. If things aren't working out, you can strip off the mortar by pulling on the screen. Loose a little sand and cement to save your sanity and/or pride. A small pointing trowel works well around the base and along the slit. A wide plaster-board taping trowel works well on the open areas. You can try using a cement finish trowel, but I have never gotten the hang of using one. A wooden float will probably pull the mortar too much, but you might try one. Always keep the trowel at a slight angle to your work. If you lay it flat, it will stick and pull the mortar off the dome. If you can find a contractor doing stucco work, go and watch him/her work. It will never be as easy as they make it look, but can learn enough by watching to make the job a lot easier.
As soon as the last of the dome is covered and the mortar is set, you can paint it. Use white rubberized mobil home roof paint. I tried a fancy two layers system the first time; black under coat and a white top coat. The two layers didn't bond to each other and the top coat filled with "water blisters" as soon as the rains started. I would recommend any decent white rubber roof paint. You can get it in 5 gal pails at your favorite mart-mart store. Make the first coat heavy. I noticed that regardless of the kind of brush I used there was a myriad of small bubbles that dried in the paint leaving pin holes. So expect to paint two or three coats. The second and third coats do not have to be heavy. Paint the entire dome, the slit frame inside and out, and the perimeter seal. You need to paint the slit frame with several heavy coats to prevent moisture from getting into the wood.
You can finish the inside with plaster-board taping plaster if you are
up for it. I just painted the inside with a flat black interior latex.
(Gets real dark inside with it black when compared to the white before
being painted.
Slit Door
The slit door is made of masonite. The curvature of the dome gives enough strength to the masonite that a thickness of 1/4" is adequate. To set a curve in the door, bent the masonite, sprinkled it lightly with water, then let it dry. The door on my dome is 8' 3-1/2" long. The door was made from an 8' strip, 25" wide. I "stretched" the piece by widening the gap at the hinges and using a wide end piece.The door folds in three pieces as shown in the photo. The Pieces are hinged with "piano" hinges. Use wide hinges if you need to stretch your door length a bit. Paint the door with a good enamel to guarantee a weather tight coating on the masonite. The hinges are sealed with rubber roofing used on travel trailers. It is a white rubber sheet and makes a great seal, see figures below.

Its a bit tricky getting the stove bolts in place. Place the bolts in
the hinge, then fold it to keep the bolts from falling out. The rubber
strip can then be placed over the bolts. The rubber will hold the bolts
while you feed them into the door. Cut the rubber 4 to 5 inches longer
than the width of the door. The over hang will keep rain from blowing into
the hinge. Measure the width and cut the rubber so it will fit snug but
not tight when the hinge is open. Use plenty of silicone caulk between
the door and the rubber.
The door is fitted with a garage door seal to provide a seal with the
slit frame. I used a "slick" finished seal, and had a real problem getting
silicone to adhere. It acted like it was bleeding oil into the silicone.
If you can find a flat finish foam-type material, it might work better.
See the figure showing the seal and finish trim. I slit a rubber hose and
used it to cover the door edges. This too bled into the silicone and made
it difficult to get a good bond. I don't know what to recommend here. You
might have to try a couple of different materials.
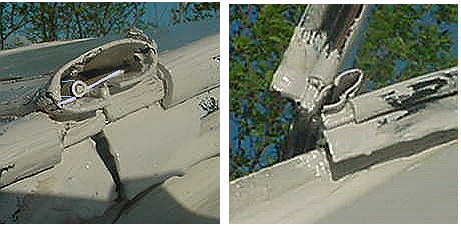
A couple more details need to be described. The two figures below show how the door opens. Notice that in the 2/3rds open position, the first door section slides along the face of the third section. A couple of "glides" are fastened to the end of the first section to allow it to slide without damaging the face of the third section. When full open, the door is supported by a stop to hold the door. There is a hook at the top of the door to catch the end of the first section. Without the hook and the door-stop, the door wants to cascade down the back of the dome. The stop also holds the door up where it can easily be pulled closed. I made the stop from a scrap of foam board. It is attached with silicone and has a rubber "shoe" on its face. The hook is cut from an aluminum extrusion. Storm doors, shower doors etc. make a good source fro finding an appropriate extrusion shape. (You can tell I spend a lot of time scrounging materials in the "dump", eh, recycling center.)
To facilitate closing the door a rope is attached to the third section.
Pulling the rope swings the folded door closed where it caught and lower.
It is then unfolded. The door is held closed by "chest" latches. The latches
are attached on the inside of the door at each end of the hinges and at
the extension of the bottom of the door. The latches are attached to catches
on the inside of the dome slit.
Since the door must be a bit longer than 8' (the length of the masonite board), to "stretch" the door, I used a couple of pieces of aluminum extrusion to sandwich the door at each end as shown in the figure.
Well that just about sums up the project.
Feel free to e-mail any questions or comments you might have, including
proof reading comments.
This material is presented with the same spirit expressed by Mel Bartels,
in presenting his Alt-Az dobsonian drive; i.e.. having been helped along
the way by others, this is offered freely to those who wish to use it for
non-commercial purposes. Maybe it can assist them in their pursuit of the
beauty of the skies. Clear skies and dark backgrounds, Joe Garlitz
HOME